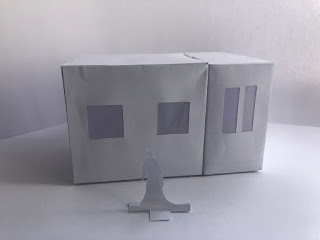
Model 1 - Iterative Model
Paper, Scale 1:50
Part A
The first version of my Iterative Model was definitely an improvement from the last model I made. I paid extra care with the template folds and corners - I used a ruler to get my edge folds really crisp and was really careful when gluing that I only glued one side at a time and focused on connecting the edges exactly so there was no overlay (this was an issue I confronted during the last few models I made).
I used my phone and a small torch to light up the inside of my building, however as the actual model itself was quite small, it proved hard to fit a light source inside to light it up from within.
Part B
I decided to make a second version of my Iterative Model as the first model was not based on the new and improved version of my living space, but I was glad I could practice getting my folding and gluing technique down. I re-designed my 'better' version of my living space so that there was an open space on the roof of the building covered by a sail cover which curled over the side of the building. I thought the curved sail cover would make for some interesting shadows. This model was designed on a scale of 1:50.
Although I liked the re-designed space and the shadows cast from the curved sail cover, I found playing with light and the effects of shadows still difficult as the model was quite small and it was hard to light up the model from within as the small torch and my phone light did not fit inside the model. On top of this, I thought the model needed a few more elements to make the building more interesting.
For these reasons I decided to design the building again to be larger and with some added features. I added double doors, larger windows and a staircase to the design so that the roof was now accessible. I initially attempted to make a spiral staircase out of cardboard however it did not go to plan. The triangular steps which I cut were not able to stick to the centre spiral as the glue I was using was not strong enough. Most likely a glue gun would be needed to make this type of stair case. Therefore I went back to experimenting with paper and folding the stair shapes. I also wanted to work with a slightly larger room with bigger windows so that I could fit a light source inside of the building more easily to play with light. I designed the building to the same scale as 1:50 however I used larger dimensions this time to make the building bigger.
 |
| Template for Expanded Living Space |
In reflection I prefer creating larger models as I found I was able to produce better light and shadow effects being able to fit a light source within the building to light it up from inside.
After experimenting with light and shadows on my new models, I also wanted to try and achieve this on my best model from last week using my scaled figure.
These photographs looked more professional than the shots which I had taken on this model last week.
Model 2 - Fusion 360 Transitional Space Model
Paper, Scale 1:50
I re-created my Fusion360 'Transitional Space' model from week 5-6 in paper from but instead of using the tongue and groove method, I sealed these spaces over and added tabs.
 |
| Fushion360 'Transitional Space' Model |
In reflection I can now see what a powerful tool light and shadowing has in communicating my design through photography. It has given depth, scale and a pleasant aesthetic to the images, especially when using two light sources - natural and artificial light.
Fusion360 - My Initials JJR
There were some constraints using my initials double JJ being a fairly narrow letters. While I wanted to have a very distinctive 'J', I was unable to create a J with a deep groove which the application would accept when creating the loft. The narrowness prevented the 'tunnel' from forming. I therefore stylised the J to be thicker which solved the issue of narrowness cutting off the 'tunnel' and it connected better with the R on the other side.
I found using Fusion 360 for the second time much easier to navigate despite this exercise requiring quite a few re-jigging of the 'J' shape. Fusion 360 will be a great tool to use to communciate designs of irregular shaped 3D designs such as this.


No comments:
Post a Comment